DIY Hand Routered Sun & Rainbow Wall Art
It’s mid February and I just put away the Christmas decor in our kids’ playroom last week. The truth is that it was just such a bright & cheery space, I didn’t want to pack it all away. However, the deed has been done and now that the wreath above the kid-sized couch is gone, there was a blank space begging for something equally bright & cheery to put in its place.

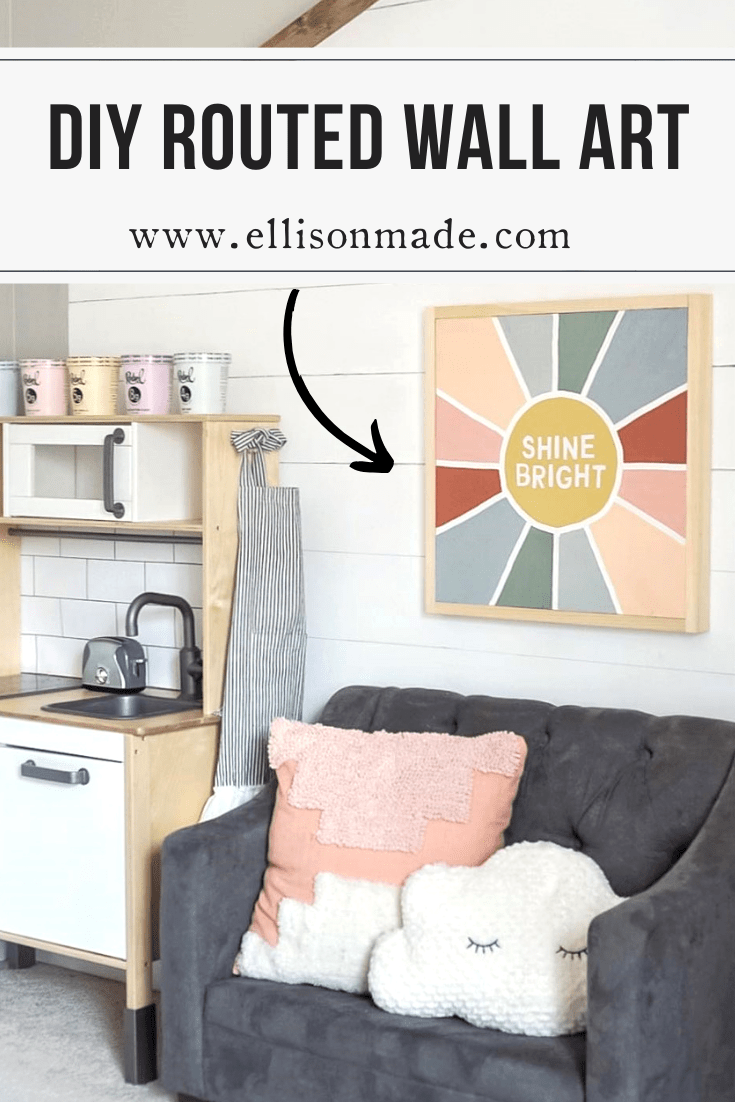
So when I was asked to participate in a DIY wall art challenge alongside some of the baddest (in a good way) lady bloggers, I knew this was the perfect opportunity for me to create something for the playroom wall. For this project, I decided to try out a palm router in the garage that my husband got off of Facebook Marketplace. Even though this router is typically used more for trim/edge work, it did what I needed to create this whimsical & colorful “shine bright” sign. Keep reading to see how I made it and make sure you check out all the other DIY wall art projects at the end of this post.
Some affiliate links are included for your convenience. Read my full disclosure here.
Supplies Needed:
-Wood Material of Choice. I used 3/4″ MDF
–Ryobi Trim Router (If I were to do more freehand sign-making, I’d recommend getting a Plunge Base Router with Handles
-Router Bit of choice. I used a 5/8″ straight bit
-Foam Brush or Foam Roller
-White Paint
-Assorted Acrylic Paints
-Hanging Hardware (if no frame)
-Select 1″ x 2″ Pine for Frame (If adding a frame)
-Miter Saw (If adding a frame)
–Brad Nailer & nails (If adding a frame)
Choose your material & dimensions
When it came to the type of wood to use on this project, I played around with some pine and plywood, but the pine wasn’t large enough to create a solid 18″ x 18″ board and the plywood’s laminated layers splintered too easily so I ended up using 3/4″ MDF. While not technically wood, medium density fiberboard (or MDF), is a composite material made from wood fibers which made for a dense & uniform material perfect for routing; it was like cutting through butter.
Sketch your design
With spring and summer arriving soon, I decided on a sun design with rainbow colored rays, loosely Inspired by this piece on Anthropologie’s website called Jasper’s Sunset.

After cutting down my MDF to 18″ x 18″, I used a bowl to make my sun and used a ruler to create the rays at 4.5″ increments.

Put on protective gear & set up a dust collection system.
Routing is messy and sawdust gets everywhere so make sure you protect your eyes, nose & mouth. There are dust collection attachments for routers, but since I don’t have one, I just kept my brush and shop vac nearby.
Apply clamps & start routing
There are many router bits out there and some are better suited for sign making, but I used what I had on hand – a 5/8″ straight bit. If you’re interested in learning more about routing wood signs with great detail, I have to recommend a friend of mind, Eric Rhoten. He has some of the best YouTube videos on the subject.
First thing you need to do is clamp down your board so that it doesn’t move because you will need two hands for routing. Plunge base routers with handles make it easy for your to maneuver around, however my palm router doesn’t have handles. There is a place for your palm to grip it, but I preferred keeping my dominant right hand on the bottom back portion and my left hand near the top (near the on/off switch) to guide it. I started by routing one of the rays and went straight into my circle shape for the sun, then routed out each of the rays individually, starting from the outside working my way inside until coming to the circle.

This is the finished design. It’s not perfect in terms of straight lines, but that’s what makes it perfect for a kid’s playroom, in my opinion. I kept the bit depth shallow, but if you want a deeper groove, it’s better to do a few shallow passes than to do one deep pass, and remember to guide the router, but don’t force it.

Paint & finish your piece
After I routed my design, I painted the recessed areas white. It’s okay if you get a little messy with the paint because you can just sand it off later or paint over it.

Now that I sanded off the excess white paint, it was time to paint the raised sun & rays. I recommend using a foam brush or a foam roller instead of a brush with bristles. A bristle brush can get into the routed area more easily than a foam brush or roller.

It helps to have a color palette in mind. I knew I wanted muted pastels so I alternated 6 colors for 12 sun rays.

Once everything was painted, I ended up using my Silhouette craft cutting machine, to add the words “shine bright” to the middle of my sun using white vinyl.
Attach mounting hardware or build a frame
If you want to go frameless, attach whatever mounting hardware you desire to the back of your sign. I ended up creating a frame out of 1″ x 2″ pieces of wood that were glued & nailed into place. The frame creates a ledge which makes it easy to hang from a panel nail in the wall. I measured two pieces that are the exact length of the sign at 18″ and then two more pieces at 19.5″ (the actual dimensions of a 1″x2″ are 3/4″ x 1-1/2″). Flip sign over then glue & nail frame into place.

Here is the completed sign hanging in the playroom. I kept the frame natural to match the IKEA play kitchen.


If you attempt to create any type of routed art work, I would love to see it so send it my way or tag me on social media @ellisonmade and don’t forget to check out the blogs below for more DIY wall art projects:
Awesome design Brittany. I love your kid’s wall art project. My router is definitely the least used tool in the shop, but I did use a big one on a router table for my challenge project this month!
Pinning!
gail
Thank you, Gail. Same here. We have a table router for framing our signs, but this little palm router was fun to play around with.
Perfection is overrated. 🙂 Love the colors!
Ain’t that the truth?! Thanks so much!
I love this! It so modern and fun! Perfect for that space 🙂
Thank you so much. I needed something bright & sunshine-y with all this rain we’ve been having lately, haha.
This looks so pretty, Brittany! I love how whimsical it looks and the colors you chose!
Thanks, Katie! It was a fun little project.