Family Friendly Backyard Makeover
This post is sponsored by the Home Depot. To see my full disclosure, click here. To see my blog post over on the Home Depot blog, you can click here.
It’s finally time for me to share our family friendly backyard transformation with you all! But before that, let me fill you in how we got here.
In July of 2019, I attended the Haven Conference which is a Home & DIY blogging conference based out of Atlanta, Georgia. Home Depot is one of their main sponsors and every year they put on what they call the “Orange Tank Competition” where multiple bloggers pitch their dream project in hopes to win! It’s kind of like Shark Tank, but instead of pitching your dream business, your pitching a project to makeover. There are three different project price tiers: $500, $2,500 and $5,000.

Here I am presenting to the panel & showing the before photos of my backyard.


And here I am showing the possible “after” of how I wanted to transform the backyard.
Before the conference, Home Depot extended the invite for anyone who was attending Haven to submit a project. Then a few weeks before the conference, Home Depot chose finalists who would go on to present a live presentation AT the conference in front of the Home Depot panel and Influencers Brad & Holly from Our Faux Farmhouse. We had to get creative in how we delivered our pitches. Some utilized a PowerPoint presentation, some made incredible 3D models of their spaces, but I stuck with old school poster board, freezer paper, wax crayons and a stapler. The freezer paper is semi-transparent so I was able to flip my “after” image over the before” to show what I wanted to accomplish.
There was a group of 12 who were selected to pitch to the Home Depot live at Haven. There were 4 finalists per price tier and there were 3 price tiers ($500, $2,500 and $5,000). I was so shocked & honored to have won the $2,500 price tier.

The 12 finalists selected to pitch to Home Depot


And the three winners from Left to Right were Cara from Never Skip Brunch (she won the $5,000 tier to create a Maker Space), Kristen from A Girl & Her Glitter (she won the $500 tier to create an InstaReady space) and then I won $2,500 to makeover my backyard. On the far left is Gbeke from Simplicity for Designs and she won a bonus Home Decor gift card for her playroom.

Why this backyard so desperately needed a makeover:
One thing I noticed when we moved from Florida to Georgia is that the land here isn’t quite as level. The backyard of our new home was no exception, it was small and for what “yard” there was, it was all on a slope so it proved impossible to put down any kind of swing set or trampoline for the girls. It also backed up to a wooded area with lots of trees and little grass.

Before photo of our backyard. The yard is small, it slopes and backs up to a a wooded area.
There was a small deck right off the back door that did provide a level area, but it was in pretty rough shape. The deck boards and railing were salvaged, but the corner deck posts were damaged beyond repair; they were warped and split due to dry rot, weather changes and loose post caps so we had to replace those.

Before photo of the deck/patio area.
How we transformed the backyard space:
When I thought about how I could make our backyard a place for our family of five to hang out, I had to get creative. Since we couldn’t put any kind of play set out here, I decided to use mother nature to my advantage and build a makeshift “play set” out of the trees.

We cleared out some of the smaller trees & debris and then attached 2″ x 6″ beams across the larger trees. I didn’t get too many photos of this since it was a two person job at all times.

We used lag bolts to attach the beams to the trees and then used hooks, carabiners and chain link to attach two hammock swing chairs on opposite sides of a trapeze bar. These woven chairs are SO comfortable and they stretch out quite a bit so everyone in our family can fit in them.

On the other side of the trees is a small open area, but it certainly wasn’t level so we built a small deck for the kids to play on that matched our main deck off the back door. Right now it houses a super cute little playhouse that I made over, but come springtime, I anticipate it holding a small inflatable pool or sandbox with umbrella.

I love how it has come together!

Can I tell you how great it has been to tell the girls to go play in the backyard when they get home from school?

How we transformed the deck/patio area:
As I mentioned before, the deck was in pretty rough shape. It wasn’t in the budget to replace all the wood so we salvaged what we could and replaced what we needed to. I began by pressure washing off the mold, mildew and old stain. You’ve got to be careful when pressure washing to remove the old stain because you have to have enough pressure and be close enough to remove it, but not too much pressure or too close to damage the wood. I did some minor damage to the wood in some areas, but I was able to go back when it was dry to sand it down. This portion of the makeover was the most labor some and took the most amount of time.

Here’s a close-up of the condition they were in before pressure washing. Yuck with a capital Y.

You can see the difference here between the old stain and raw wood.

I used Behr’s premium solid color waterproofing stain and sealer in one. The color I chose was “Slate”. After all that work, I wasn’t about to skimp on the quality of product I was going to put on it.

The old posts were beyond repair so we replaced them and decided to extend the posts up so that I could hang string lights from them at night.

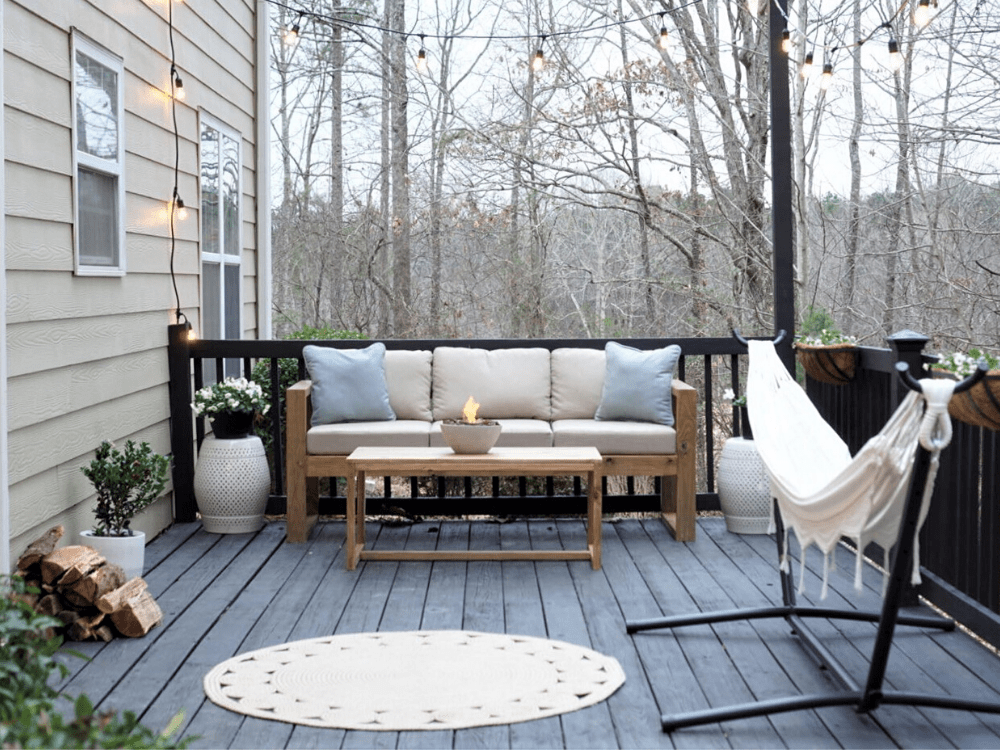
We also built an outdoor sofa out of necessity. I had one that I loved when I made my pitch to the Home Depot, however by the time I received the funds to begin the project, it was sold out. I requested to be notified when it was back in stock, but with a few weeks passing and my timeline coming close to an end, we decided to DIY our own using 2″ x 4″s, 1″ x 4″s and our kreg jig.

The sofa’s dimensions were custom built around these outdoor sofa cushions. It’s been so nice having outdoor seating!

We also built a matching coffee table and I made a DIY concrete fire bowl using concrete, gel fuel & lava rocks for a little ambience.

To finish the small deck area, I added two white ceramic stools that double as side tables to hold plants, books or a mug. And the most gorgeous white fringe hammock with metal stand.
And lastly, what kind of family friendly backyard would it be if I didn’t create some sort of fire pit area with seating to surround it? This area was the last that we did and we were right at our max budget. The fire pit I wanted was $400 so I decided to save money by salvaging our old fire pit metal bowl and purchasing a few trapezoid pavers to create a similar, but much cheaper, fire pit. I arranged them while at Home Depot to make sure I liked the way they looked before lugging them all home. A stack of pavers isn’t the most convenient thing to return if you don’t like how it looks, haha.

As for the seating, I loved the look & pricepoint of these resin Adirondack chairs, but I could only find them in gray/taupe.

A few cans of black spray paint later, they are as good as new.

It was around Christmas time when we finished this project so we wrapped the tree trunks with white lights, however I’m 99% certain they will be staying up year round.

Our family friendly backyard is complete and I want to give another big thank you to Home Depot & the Haven Conference for this opportunity. I will be making individual in-depth blog posts for the outdoor sofa DIY, the concrete fire bowl DIY, how to hang the hammock chairs from trees and how to pressure wash & stain the deck so stay tuned for those. If you’re following me on social media, I’ll update when those posts are live. To see my blog post over on the Home Depot website, click here!
Here’s one last before and after for good measure.

DECK BEFORE
DECK AFTER


Love it ! I’m currently in the process of staining my deck with the same color Slate! How many coats did you use ?
I just did one coat actually since it’s the solid stain it kind of goes on like paint, however I may do another because there are still some splits/cracks I’d love to fill. Good luck!!