DIY Clay Wall Pocket
DIY Clay Wall Pocket
Last year, for next to nothing, I repurposed an area in our home to create this simple DIY drop zone. It has become a family hub to hang our belongings, collect our daily mail and of course, display our monthly calendar to keep track of all of life’s events and activities. One of the sourcing questions I get asked most about the drop zone is, “Where did you get the pen holder on your wall?” Well, it’s actually marketed as a wall planter, but when I purchased them from a wholesale company to sell in my online shop, I realized it was so much more handy than just a planter, it could hold all kinds of trinkets like keys, small remotes and of course, my dry erase markers for our wall calendar.

Since I will no longer be carrying the wall pockets in my shop, to instead focus on selling my handmade goods on Etsy, I decided I would figure out a way to make one of my own using clay. If you would rather buy than DIY, don’t worry, you can find the original wall pocket here on Amazon in two different sizes. But today, I’m sharing how I made my own with a sweet scallop trim.
Here’s what you’ll need to make your own DIY Clay Wall Pocket:
–This brand of Air Dry Clay. I’ve tried many brands. This is one of the best quality for your money.
-Ruler
–Parchment Paper
-Small bowl of water
–Exacto Knife or sharp blade
-Tissue or Toilet Paper
-Rolling Pin
-High Grit Sandpaper, 220-320
-Paint and/or Sealer. (This is my favorite non-yellowing spray sealer)
-Cardstock & Scissors if you want to print & cut my template below. Click on image and save. Print full size.

Here’s how to make your own DIY Clay Wall Pocket:
1. Roll out your clay.
Grab a portion of clay and roll it in your hands to warm it up and make it pliable, then in between two pieces of parchment paper, roll out your clay to a minimum thickness of 3 – 5 millimeters (or 1/8 – 1/4″ inch). If you roll it out any thinner, the clay will be too fragile to handle and may break. Use your ruler to double check uniform thickness.

2. Cut out your pieces.
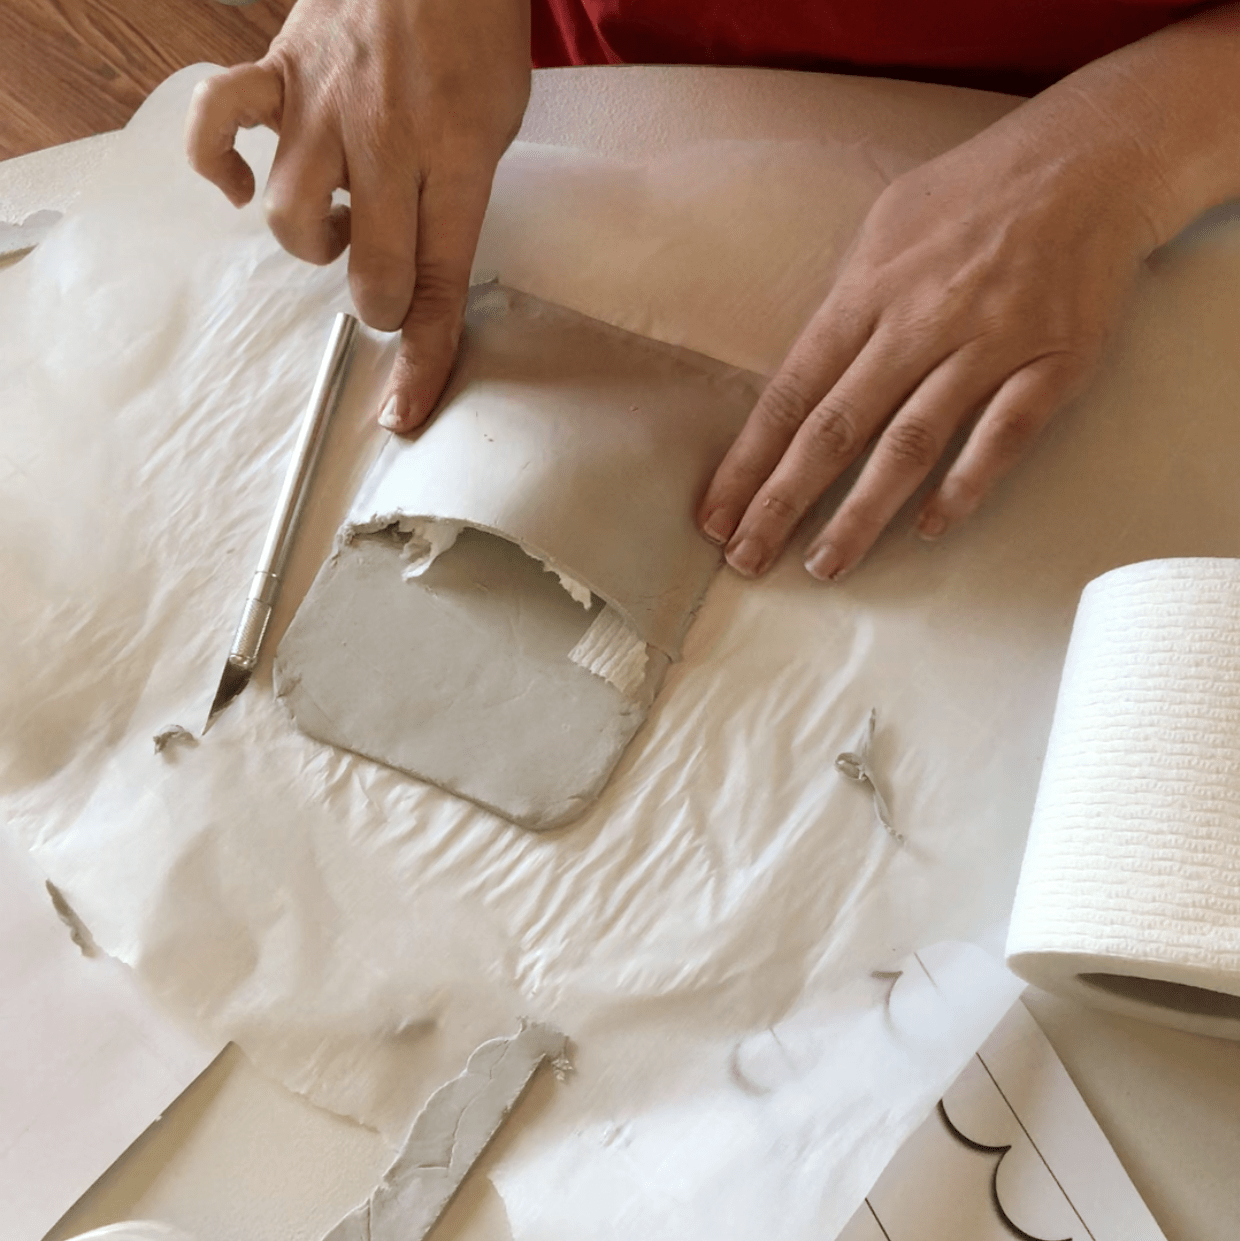
You can freehand whatever shape and details you’d like or you’re welcome to print the template I created for you. I recommend using cardstock as a stencil because the clay is damp and will stick to regular paper. Use a sharp blade to cut out your pieces, making sure that the front piece slightly overlaps the back piece as this is the amount of space that creates the pocket. Also, don’t forget to cut out your nail hole! I just used a marker top and twisted it to remove a create a small hole.

3. Score and seal the edges.
Dry fit before joining the seams. Place a few pieces of tissue inside to support the front pocket. If everything looks good, score the edges and press firmly along the outer edges to join the two pieces together. If there are any cracks or imperfections, you can dip your finger into a bowl of water and buff them out using a small circular motion.


4. Stuff your pocket.
Continue tearing off small pieces of tissue and stuffing inside the pocket to create the perfect amount of space. The tissue will serve as a support while the clay dries and will be removed before sanding, painting and sealing.
5. Let the air dry clay… dry.
The instructions say the clay requires 36-48 hours to dry fully and left on its own, that is true, but you can speed up the process by using a space heater or hair dryer on the low heat setting. The clay starts out gray and turns white as it dries.

6. Smooth and sand any imperfections.
One thing I love about this brand of air dry clay is that you can sand everything down to a smooth finish once it’s fully dried. I had a few spots and cracks and was able to use 320 grit sandpaper to remove them. Make sure you blow or wipe off any dust. Multiple thin coats of paint help to fill any flaws, too.
7. Paint and or seal.
The clay dries a rustic white color. You can leave it as is, but it will not be as durable if you don’t seal it. You can not use it as a wall planter with any plants that require water (air plants would be fine) if you don’t seal it, so I recommend painting and/or sealing your wall pocket. I opted for a satin white spray paint finish, I find that spray painting gives the best finish.

That’s it! I hope you liked today’s tutorial and if you attempt to make one of these, please tag me @ellisonmade – I love seeing your creations. Happy making, friends.
You did such a beautiful job on your pocket. I can tell you spent a good amount of time sanding; smooth and shiny. I just wanted to let you know that air dry clay is never water proof. The exception is if the piece has a resin coating or a polyurethane meant for boats. I usually use UV resin, but only if it’s going to get wet. It’s unfortunate really.
Also speeding up the drying time in any way will increase the chances of it cracking. The ‘pro’s’ say to dry it as slow as possible. Sometimes even covering it loosely so the clay doesn’t dry at different times which is what causes the cracking.
Please don’t take this as a ‘know-it-all’ reply. I’m sure you’ll make more pieces because it is truly addictive!! Just want to make sure nothing happens to those works of art!
Thanks so much for your words of wisdom – no liquid goes in here, just a holder for dry erase markers and/or wall remotes. I agree – it is so much fun to play with!