DIY Vertical Board & Batten Accent Wall with Crown Molding

When we purchased the home we’re in now, we knew it wasn’t going to be our “forever home”, the plan was to live here for a few years and update it as we go.
One of the things I liked about this house was that it was recently painted throughout in a neutral gray color. That meant I didn’t have to worry about covering up magenta or lime green walls as soon as we moved in, but now that we’ve lived here for three years, it was finally time to give this big gray box of a room an upgrade!

This room is at the back of the house, which is surrounded by trees, which means it doesn’t get much natural light. The couch is next to replace on the list, but first I wanted to lighten & brighten up the walls. I decided on a white vertical board & batten accent wall; light colors make the room appear larger, while the vertical direction of board & batten draws the eye up, making the room appear taller.
There was just one setback… we needed to work around our existing crown molding. It’s one thing to remove crown molding from a closed room, but our crown molding goes around the entire perimeter of the house downstairs so I wanted to keep it uniform throughout. From all the tutorials and photos I found of vertical board and batten, I didn’t find any dealing with existing crown molding. Most people either:
Butt the boards directly up to the ceiling like Jamie from Southern Revivals did in her tutorial. (photo below)

Or they go with the more common look of running a horizontal board across the top like Christine from Honey Built Home did with her wall. (photo below)
Sam held up a horizontal board underneath our existing crown molding to see how it looked and it was a little bulky and awkward looking so we scrapped this plan.

Instead, I decided to just butt the vertical boards right up to the base and crown molding. Even though there was a difference in depth, I figured I could see how it looked once it was up and if it didn’t bother me, we’d leave it, but if it did bother me, we’d fix it. (Spoiler: it did bother me so we fixed it with adding trim pieces in between the MDF boards and the base/crown molding. You’ll see this in the blog post, but if I were doing this all over again, I would’ve attached the trim pieces first BEFORE cutting down & attaching our vertical pre-primed MDF boards.)
This post is sponsored by Woodgrain. They’re the leader in high quality wood moldings, doors, and windows. From owning the forest & cutting the timber to production in their manufacturing facilities to the delivery of goods, Woodgrain is proud to be family owned and operated. To find a dealer near you, click here.
HERE ARE THE SUPPLIES YOU WILL NEED FOR A VERTICAL BOARD & BATTEN ACCENT WALL:
–Pre-Primed MDF Boards. I went with 5.5″ wide boards, but Woodgrain makes boards in all sizes.
–Sliding Miter Saw (You can go with a cheaper, smaller miter saw like this 10″ one if your boards are 5.5″ wide or less)
–Airstrike Nail Gun & Nails (My #1 favorite tool)
-Trim Molding of Choice. This is to fill in the gap between the MDF boards and the crown/base molding. I went with Base Shoe Molding.
–Construction Adhesive (Optional)
–Caulk & Caulk Gun
–Nail Hole Filler/Spackle
-Paint Color of Choice. I went with Behr’s “White” (Not to be confused with Ultra Pure White which is their ready-made base white.)
-Paint Brushes, Roller & Tape
HERE IS HOW TO CREATE A VERTICAL BOARD & BATTEN WALL WITH CROWN MOLDING:
This is a rather simple project, I think the hardest part is figuring out the math involved. My husband sat down with paper and pencil in hand and asks, “how many boards are you putting up and how much space do you want between each board?” Oh, to be left-brained. Sorry, babe, but you married a right-brained, visual learner so we must bring all the boards inside and play around with them until I get an idea of what I like. After doing so, we finally decided on 11 boards total.
We started by measuring and cutting down the two corner pieces and attaching them to the wall. Your boards may or may not hit a stud, but with a few dabs of construction adhesive on the backside and a few nails, they’ll be secure enough on the wall.

HERE IS THE FORMULA I USED FOR FIGURING OUT THE AMOUNT OF SPACE BETWEEN EACH BOARD:


Next was cutting all of our boards down to size and also cutting two boards as close to 12.65″ to use as spacers. Keep in mind that walls are not always perfectly level and square. We were going to cut all the boards down at once and thank goodness we didn’t because there was a .75″ difference between the left and right side of the wall.
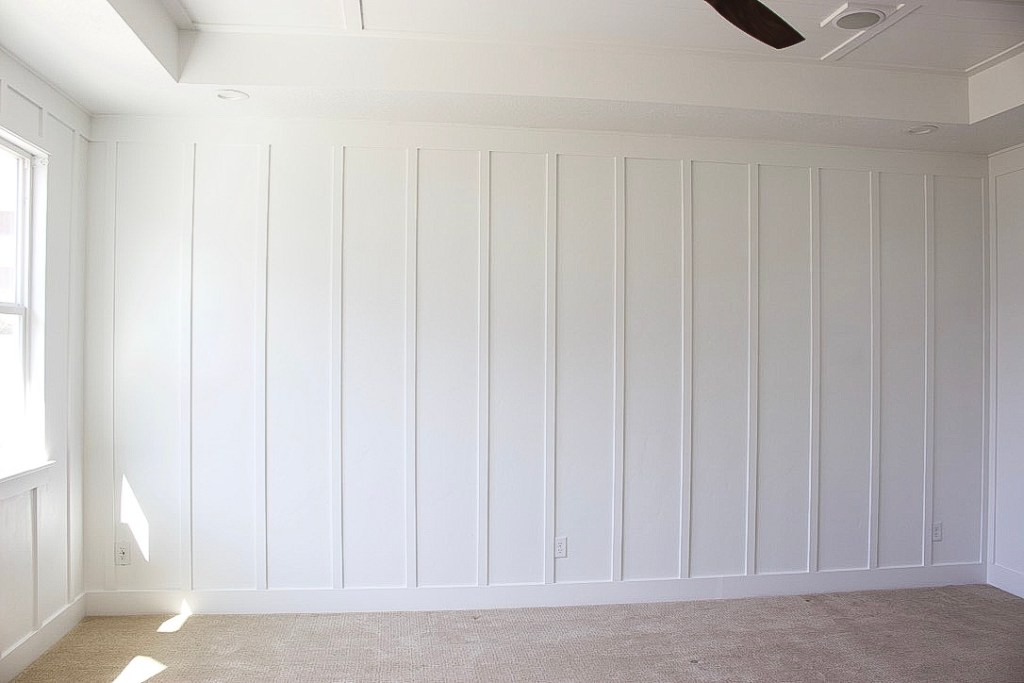
Once all the boards were up, I was able to step back and see how it looked. I still think it would’ve been perfectly fine to start caulking and painting everything, but I decided I wanted a more finished look. The thing that bothered me were the shadows case at the ends of the boards. See what I mean in the photo below? There’s an obvious difference in depth between the crown molding and the MDF.

At this point, I knew I wanted the boards to run flush into the crown molding so that meant adding a piece of trim to the top and bottom (and this is why I mention in the beginning that if we were to do this all over again, I would’ve attached the trim pieces first before cutting & attaching the MDF boards). We used the base shoe molding for both – the curved edge faced out for the base molding and the curved edge facing in for the crown molding, but another option would be to rip your own trim on the table saw from your MDF.


Now that all the trim work was attached, it was time to caulk ALL the seams, left, right, top to bottom. I recommend cutting the tip of your caulk tip at 45 degree angle instead a 90 degree angle, this will help to guide the caulk into the corners instead of it squirting out like toothpaste. I also like to keep a cup of water nearby so I can dip my finger in the water and run it along the caulk line to smooth everything out.

Once the caulk dried, I started to paint everything by cutting in the insides with a small brush and then using my paint roller to fill in the larger portions. I had to paint the crown molding and baseboards since they looked yellow compared to the fresh coat of white paint.


And here is the wall all finished! I’ve got plenty of plans for this room, but the accent was was the first of many updates.


Thank you for this and all the details provided. I am looking to do this in my master bedroom.
You’re most welcome! Thanks for stopping by 🙂
This is SO helpful!! I really want to do a feature wall in my living room but our entire main floor has crown molding & my husband said it won’t work. But where there is a vision there is a way!! Thank you so much for taking the time to explain this! I can’t wait to show my husband!
Yay! Made my day – so glad you found this helpful!
Thank you so much for sharing 🙂
This is exactly what I want to do in my room, do you have an up close photo of how you ran the boards into the crown?
I’m so sorry, I don’t and we no longer live in that home otherwise I’d get a picture for you 🙁 I just butted them up directly to the crown, but because my crown molding curved, there was a gap where the board met the crown so I added quarter round (flipped it around) & fit perfectly. I then caulked everything and painted. Unconventional, for sure, but worked in the end 🙂
Did you paint the baseboards and crown moulding for just this wall? Or did you have to paint the others walls moulding as well?
Yes, that’s exactly what I did for the crown molding – the wall and molding were white so I just went over the crown molding with the same wall color to refresh it a bit. I would not have done this if the walls were a different color.
Do you have a more up close photo showing -rather than explaining- how the base shoe is attached above the baseboard and below the crown? I’m also a visual learner & I’m hitting this same issue in my daughters room with the exact same crown & base you have.
Hi Marlee, Unfortunately I don’t as we have since moved from that house otherwise I’d take a close up for you. I just flipped the molding around until it fit like a puzzle piece. I’m sorry & good luck 🙂
About to take on this project… Did your walls have texture on them? Our walls have a fine orange peel texture and I’m worried about the difference between that texture and the smooth MFD boards.
Hi Sara!
Fortunately, the walls in our Georgia home were not very textured at all. Nothing compared to where we live now in Florida where most homes were built in the 70s/80s and have orange peel textured walls. To cover the texture, you could purchase thin sheets of 5mm underlayment (this is what I always use for my faux shiplap look) to cover the walls and then place the boards on top of the seams. If you don’t think the texture will bother you that much, just choose a flat or eggshell paint as that will conceal the texture better than a satin paint. Good luck and I hope it goes well!
Is it necessary to call?
Hi Carolyn! Do you mean caulk? No it’s not necessary, it just gives it a more finished look, but if you are wanting a temporary solution, you may not want to caulk as it can be laborsome to remove.