DIY Faux Whitewashed Brick Wall
This post is sponsored by The Home Depot.
I only work with brands I love & as always, all opinions are 100% my own.

When we first toured our home, I instantly noticed the tall ceilings and large entry way area, which were two things we didn’t have in our previous home, so I was excited about the potential to decorate this area once we moved in.

I initially made this wall into a drop zone for our kids, but recently relocated it to the hallway area complete with hooks at their level and added a calendar and mail holder to complete the family command center. Here is the DIY board & batten drop zone area if you want to check it out. I think I was sick of being greeted with bags and belongings everywhere and wanted something a bit more welcoming when you walk in the front door. So after moving our drop zone, our entry way wall was blank again!

I’ve always loved the look of German schmear, but installing real brick was out of the question, plus I change my mind often when it comes to decor so I’m always looking for a less permanent solution which is why I decided a faux whitewashed brick accent wall using the brick panels from Home Depot.
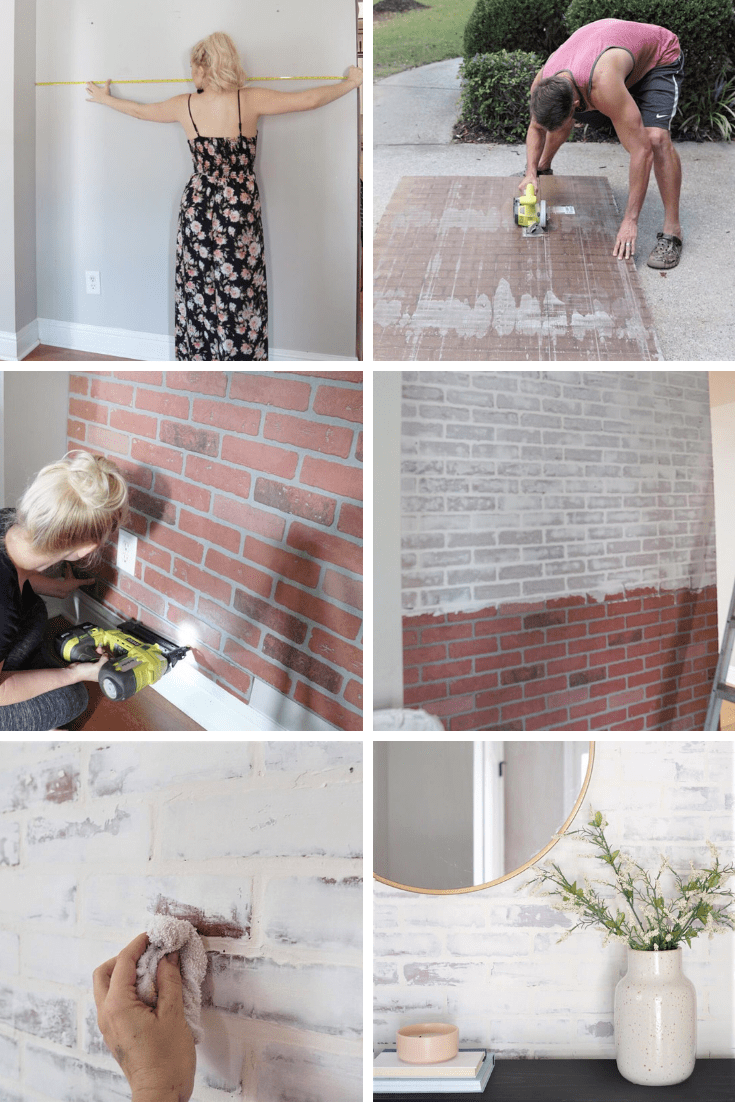
For the full step-by-step tutorial, you can find it over on The Home Depot Blog, so click here to check it out, but I’m also going to share 5 tips below to ensure a great turnout if you attempt your own faux brick wall, so keep reading or come back to read about those.

TIP #1 -Use a plastic putty knife or hand trowel.
I’ve read from others who have done a similar wall that the metal can scrape away at the red brick material and when applying the joint compound, you can end up with a pink tint to your wall. I had no pink tint whatsoever, but the joint compound did dry a little on the yellow side for my liking at first, so I made sure to clean my putty knife in between sections. Also, since I knew I was sealing my wall with a mixture of white paint and water, I figured it’d brighten it up and take away the yellow, which it did.
Tip #2 – You can remove dried joint compound with a wet washcloth.
Throughout the process I kept a slightly damp washcloth near by to remove joint compound when it was still wet, which made it very easy to tweak the look as I was applying it. However, once the joint compound dried, I noticed it dried much more white and opaque than when it was still wet. Because of that, I wanted to go back and remove more of the joint compound on the wall, but since it had already dried, I thought that I had to sand it. I did one or two bricks before deciding to stop because it made such a mess with dust everywhere. Thanks to a fellow blogger friend @makingmanzanita, she informed me it could still be removed with a wet cloth even after it was dry. That was a very helpful tip I wanted to pass along.
TIP #3 – Plan your final look before starting work
Do you want your wall to be mostly white or mostly brick or a mix of the two? The cool thing is that there really is no right or wrong way to do this, however if you know you want more of the red brick showing through (as opposed to mine which is more white and less brick), you’ll want to keep that in mind because you probably won’t want to seal with white paint and water, you’ll want to retain the red bricks exposed and will want to seal with a water based matte polycrylic (do not use polyurethane which has a tendency to yellow over time).
Tip #4 – Nail into the recessed mortar lines
Before you nail your panels to a wall, you can add construction adhesive to the back if you want, but I didn’t find this step necessary. The first thing you want to do when nailing the panels to the wall is to locate the studs and nail into them, then everywhere else around the perimeter and especially close to where two panels meet. But just as important is to nail directly into the recessed mortar lines or what you would call the grout lines if this were tile. That way, when you smear your joint compound over the bricks, it will fill in the recessed areas and hide any nail holes whereas if you nailed into the brick and then removed the joint compound you’d still see a nail hole and that’s no bueno.
Tip # 5
If you need to use more than one panel, I have seen some people zig zag cut their panels to fit like a puzzle next to each other to help hide the “seam” where two pieces meet. If I were to do this project again, I still don’t think I would do the zig zag technique, but I would pay extra close attention to more nails where the two panels meet. This is because if they are NOT exactly flush next to each other, the seam in the brick is more noticeable with a fracture line in the middle of a brick that shouldn’t be there. Thankfully I noticed this as I went, but for the areas that were already done, I just added a dab more joint compound on those and it concealed it pretty well.
That’s about it! I’ll list the supplies below, but don’t forget to head to the Home Depot Blog for the full step-by-step tutorial and let me know if you have any questions!
Supply List:
-Kingston Brick Panels
-Ryobi Brad Nailer
-Ryobi Circular Saw (or a Table Saw to cut down panels)
-Jigsaw or Hand Saw
-Joint Compound (White, all-purpose)
-Putty Knife or Hand Trowel (I opted for a plastic one as not to damage or scrape too much of the panel board)
-Painter’s Tape
-Flat White Paint or Matte Polycrylic
-Paint Brush
-Stud Finder
Hi
What is your ratio for paint to water ? Thank you
Great question! I eyeballed it, but I’d say about 25% water to 75% paint, just enough to thin it out some so that it wasn’t too opaque. Definitely no more 50:50 though ❤️
What did you do about the exposed end? I plan on trying the brick on a wall but am curious what do with with an open end wall.
I actually left it exposed and it doesn’t bother me, but I also considered adding outer corner trim to the outside and the inner corner edge. They sell corner both moldings at home improvement stores. I may do that if and when we move.
Hi! I’m half way through my project just need to do the final part of whitewashing. I was doing research and it kept saying you must prime joint compound to prevent flashing- does that not matter here because we’re doing the entire space and flat paint already doesn’t have shine? Thank you!!!
Great question! Hmm.. I used a paint and primer in one so I can’t so for certain and it was an eggshell finish, there is no noticeable shine unless you were to use say, a glossy or satin finish paint and primer in one.
Hi! When I click on the link to your Home Depot blog it says that it is blocked. Any ideas on how I can get to it? Thanks!
Hi Lauren. I saw that, too, and I’m not sure why this new message occurs – HD recently switched all of their blog posts to a different area of their website. There is an option to continue to site but here is another direct link you can try:
https://www.homedepot.com/c/ap/diy-faux-whitewashed-brick-accent-wall/9ba683603be9fa5395fab9019571414f
What is the paint color you used on the wall of the family command center ?
Now that it’s been a couple of years, how is it holding up? Most people use construction adhesive but I’d rather not have to destroy the drywall completely to take this down again someday so I’m really hoping it’s great for you so I can do without the glue! 🤞🤞
Hi Lor!
We no longer live in that home, however I will say that it held up well with the exception of the seam where two panels met and the reason for that, in hindsight, was because I did not nail close to the edge all the way up and down on both sides so the joint compound cracked in some areas, but a light coat on top fixed it. I don’t regret not applying permanent adhesive because I could’ve just used more nails.